L'ESP32-C3 Super-Mini
- Processor: 32-bit RISC-V CPU running up to 160 MHz
- IEEE 802.11b /g/n WiFi and Bluetooth 5 (LE) protocols
- 400KB SRAM, 384KB ROM and built-in 4M flash
- Compact SMD antenna
- 11 GPIOs that support the following interfaces:
- 4 ADC pins
- PWM
- UART
- I2C
- SPI
- Onboard LED on GPIO 8
- Reset and Boot buttons
- Ultra low power consumption: as low as 43uA in deep sleep mode
- Small form factor
- Tension: 3.3~6V
- WiFi: 802.11b/g/n protocol, 2.4GHz
- Bluetooth: BT 5.0
- SPI Flash: Built in 4M
- Pin interfaces: 1xI2C, 1xSPI, 2xUART, 11xGPIO (PWM), 4xADC
- Onboard LED blue light: GPO8 pin
- BO0: Appuyez longuement sur le bouton de téléchargement, branchez le câble USB, puis relâchez-le pour entrer en « mode téléchargement ».
- RST: Bouton de réinitialisation, le programme en cours d'exécution redémarre ou se réinitialise.
- Interface USB : peut être utilisée comme alimentation pour les cartes de circuits imprimés ou comme interface de communication pour connecter des PC et des ESP32C3.
- Taille: 24,8mm x 20.45mm

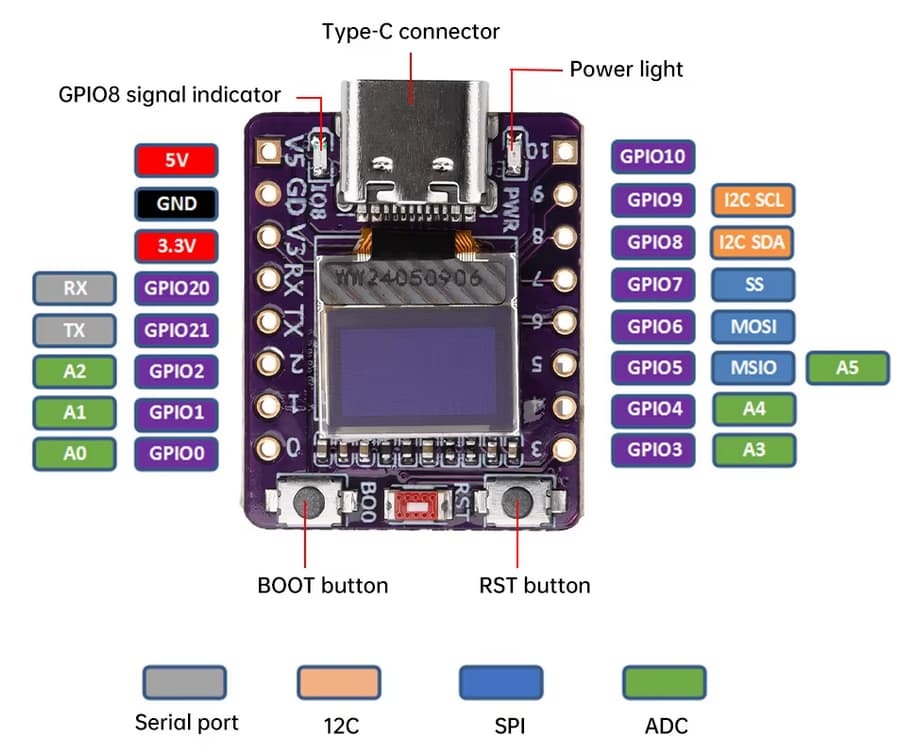
L'ESP32-C3 OLED
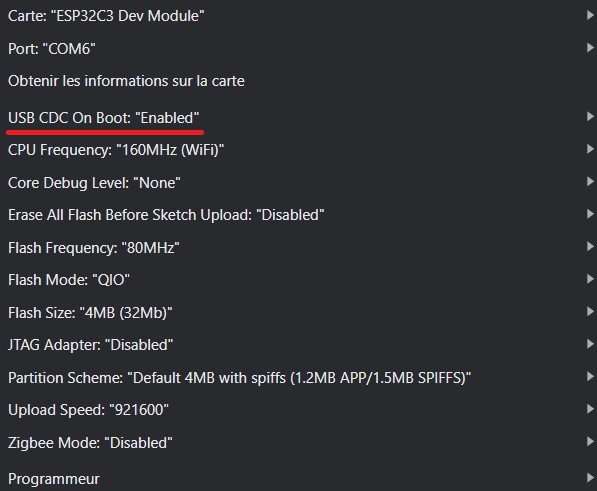
La carte de développement ABROBOT avec ESP32-C3 est une plateforme IoT compacte prenant en charge nativement l'alimentation USB (CDC), éliminant ainsi le besoin d'un convertisseur externe.
Pour un fonctionnement optimal, il est nécessaire de flasher un nouveau chargeur de démarrage.
L'écran OLED intégré offre une résolution effective de 72 × 40 pixels, bien que des bibliothèques comme U8g2 requièrent une résolution de 128 × 64 pixels.
L'écran est connecté via I2C par les broches GPIO5 (SDA) et GPIO6 (SCL) à l'adresse 0x3C.
Un décalage d'affichage de (30, 12) assure un rendu correct, et la résolution est limitée à 72 × 40 pixels pour éviter le rognage.
Parmi les autres fonctionnalités, on trouve une LED intégrée sur GPIO8, la communication UART sur GPIO21 et GPIO20, une seconde interface I2C sur GPIO8 et GPIO9, le SPI, un convertisseur analogique-numérique (GPIO0 à GPIO5) et le bouton BOOT sur GPIO9 pour le démarrage ou la réinitialisation. Cette carte est idéale pour les projets IoT qui nécessitent flexibilité et format compact.
Programme SERIAL/USB
// ESP32 C3 Super Mini
#include <Wire.h>
void setup() {
  Serial.begin(115200);
}

void loop() {
  Serial.println("BONJOUR");
  delay(5000);
}
Programme OLED
#include <U8g2lib.h>

#include <Wire.h>

// Il n'existe pas de constructeur 72x40 dans u8g2 ; par conséquent, l'écran 72x40 est :
// mappé au centre de la mémoire tampon de pixels 132x64 du contrôleur SSD1306
U8G2_SSD1306_128X64_NONAME_F_HW_I2C u8g2(U8G2_R0, U8X8_PIN_NONE, 6, 5);
int width = 72;
int height = 40;
int xOffset = 28; // = (132-w)/2
int yOffset = 24; // = (64-h)/2

void setup(void)
{
     delay(1000);
     u8g2.begin();
     u8g2.setContrast(255); // set contrast to maximum
     u8g2.setBusClock(400000); //400kHz I2C
     u8g2.setFont(u8g2_font_ncenB10_tr);
}

void loop(void)
{
    u8g2.clearBuffer(); // clear the internal memory
    u8g2.drawFrame(xOffset+0, yOffset+0, width, height); //draw a frame around the border
    u8g2.setCursor(xOffset+15, yOffset+25);
    u8g2.printf("%dx%d", width, height);
    u8g2.sendBuffer(); // transfer internal memory to the display
}
Programme LED/USB
// ESP32 C3 Super Mini on-board LED (works with inverted logic)

const int ledPin = 8;

void setup() {
  Serial.begin(115200);
  pinMode(ledPin, OUTPUT);
}

void loop() {
  digitalWrite(ledPin, HIGH);
  Serial.println("LED OFF");
  delay(1000);
  digitalWrite(ledPin, LOW);
  Serial.println("LED ON");
  delay(5000);
}
Serveur Wifi
#include <WiFi.h>
const char* ssid     = "SamFormation";
const char* password = "";

IPAddress local_ip(192,168,0,1);
IPAddress gateway(192,168,0,1);
IPAddress subnet(255,255,255,0);

void setup()
{
  Serial.begin(115200);
  Serial.println("\n[*] Creating AP");

  WiFi.mode(WIFI_AP);
  WiFi.softAPConfig(local_ip, gateway, subnet);
  WiFi.softAP(ssid, password);

  Serial.print("[+] AP Created with IP Gateway ");
  Serial.println(WiFi.softAPIP());
}

void loop(){}
Serveur Wifi - WebServer
#include <WiFi.h>
#include <WebServer.h>
const char* ssid     = "SamFormation";
const char* password = "";
const int output = 8;
String outputState = "OFF";
// Create a web server object
WebServer server(80);

IPAddress local_ip(192,168,0,1);
IPAddress gateway(192,168,0,1);
IPAddress subnet(255,255,255,0);

// Function to handle the root URL and show the current state
void handleRoot() {
  String html = "<!DOCTYPE html><html><head><meta name=\"viewport\" content=\"width=device-width, initial-scale=1\">";
  html += "<link rel=\"icon\" href=\"data:,\">";
  html += "<style>";
  html += "html { font-family: Helvetica; text-align: center; background: #f5f7fa; margin: 0; padding: 20px; }";
  html += "body { max-width: 600px; margin: 0 auto; background: white; padding: 20px; border-radius: 10px; box-shadow: 0 2px 10px rgba(0,0,0,0.1); }";
  html += "h1 { color: #333; font-size: 28px; margin-bottom: 20px; }";
  html += "p { color: #555; font-size: 18px; margin: 10px 0; }";
  html += ".button { background: #4CAF50; border: none; color: white; padding: 12px 24px; text-decoration: none; font-size: 20px; border-radius: 8px; cursor: pointer; transition: background 0.2s ease; display: inline-block; width: 120px; box-sizing: border-box; }";
  html += ".button:hover { background: #45a049; }";
  html += ".button2 { background: #555555; }";
  html += ".button2:hover { background: #666666; }";
  html += "</style></head>";
  html += "<body><h1>ESP32 Web Server</h1>";

  // Display GPIO controls
  html += "<p>GPIO - State " + outputState + "</p>";
  if (outputState == "ON") {
    html += "<p><a href=\"/off\"><button class=\"button button2\">OFF</button></a></p>";
  } else {
    html += "<p><a href=\"/on\"><button class=\"button\">ON</button></a></p>";
  }

  html += "</body></html>";
  server.send(200, "text/html", html);
}
// Function to handle turning GPIO on
void handleGPIOOn() {
  outputState = "ON";
  digitalWrite(output, LOW);
  handleRoot();
}

// Function to handle turning GPIO off
void handleGPIOOff() {
  outputState = "OFF";
  digitalWrite(output, HIGH);
  handleRoot();
}

void setup()
{
  Serial.begin(115200);
    // Initialize the output variable as output
  pinMode(output, OUTPUT);
  // Set the onboard LED to LOW (inverted logic)
  digitalWrite(output, HIGH);
  Serial.println("\n[*] Creating AP");

  WiFi.mode(WIFI_AP);
  WiFi.softAPConfig(local_ip, gateway, subnet);
  WiFi.softAP(ssid, password);

  Serial.print("[+] AP Created with IP Gateway ");
  Serial.println(WiFi.softAPIP());

   // Set up the web server to handle different routes
  server.on("/", handleRoot);
  server.on("/on", handleGPIOOn);
  server.on("/off", handleGPIOOff);
  // Start the web server
  server.begin();
}

void loop(){
  server.handleClient();
}